
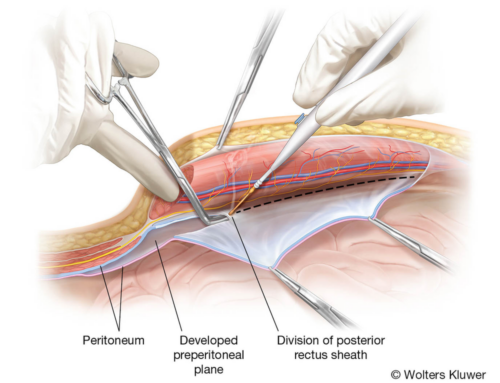
Chequered skipper butterflies used to be comparatively common in England, but became extinct here over 40 years ago. There’s still a population in Scotland, but nothing in England. However, the good people at Butterfly Conservation and Back to the brink teamed up with other conservation partners and set about changing that.
The result is the re-establishment of a breeding population of Chequered skippers in Rockingham forest, Nottinghamshire. And, as a part of the publicity surrounding this conservation success story, Back from the Brink (Roots of Rockinghan) asked me to run an online illustrations workshop, painting this iconic butterfly.
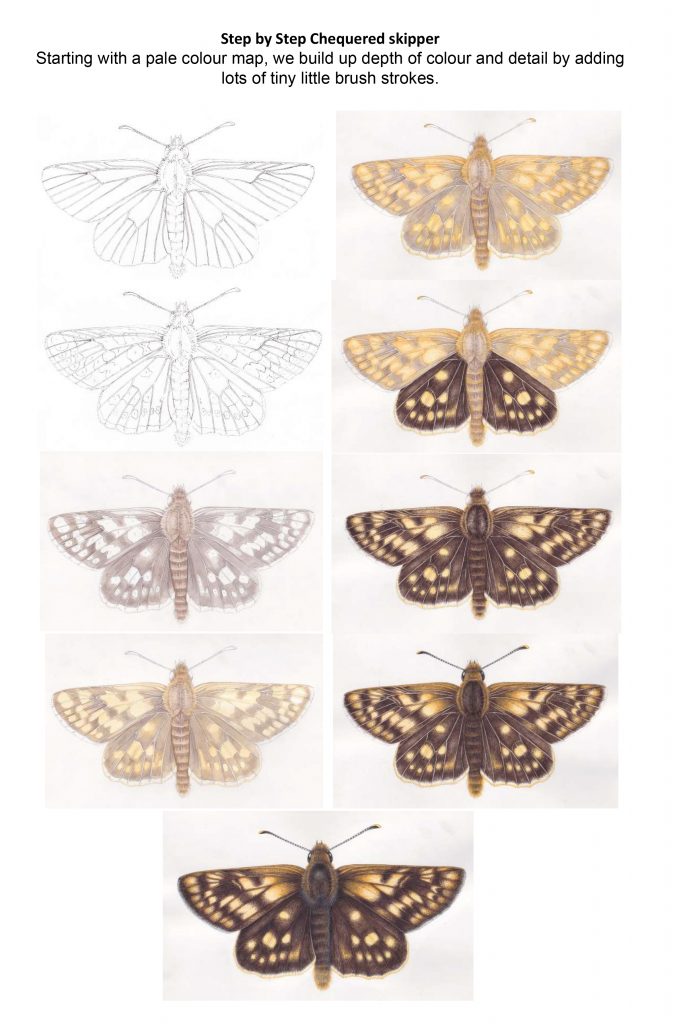
This blog explains the steps involved in illustrating a Chequered skipper butterfly Carterocephalus palaemon. Be aware that sticking to all these steps will take a long time. If you want a swifter result, you could go through to step 7, and then just add darker areas of colour without using the tiny brush strokes technique.
This approach is how I illustrate all the butterflies I get asked to draw. To see more examples of my butterflies, take a look at my butterfly galleries. There are also some step by step guides to illustrating other species of butterfly in amongst my blogs.
Gathering reference
Get your reference together. A real specimen is always great, but be aware dead and pinned specimens hold their wings differently to living butterflies. In this case, Butterfly Conservation provided me with a photo. If you use photos you find online, do contact the photographer and ask for permission to use their images.

Photo from Butterfly conservation, with lower image showing the wings with typical Hesperiidae venation overlaid
It’s advisable to have several photos to refer to, in order to avoid perpetuating mistakes that may occur in one photo, and to give a better “feel” to what the norm for the species is like.
It’s also important to know where the veins are as these help to guide you around your drawing, and add biological accuracy.
Draw up the Butterfly
You can do this two different ways. First, draw the butterfly by hand, drawing straight to page. Check your measurements, and that your drawing has the correct proportions. Do this by checking various measurements against your reference. I draw with a mechanical Pentel P205 pencil, o.5 H or HB lead.
Second approach is simply to trace the photo and transfer the tracing to hotpress watercolour paper. You only need to draw or trace one half of a butterfly as they are symmetrical. Flip the tracing paper to get the other half. Again, you need the photographer’s permission if you want to use this approach.
If you’re drawing freehand, a good way to draw a perfectly straight line (which you’ll need for antennae and veins) is simply to look at where the line is going, rather than at the tip of your pencil. This comes in handy when you’re using a paintbrush later on.
Add the markings
If you’ve been sure to include the venation in your drawing, this isn’t too hard, just plot in the blotches of colour, using the veins as a map. If you’re doing a tracing, you’ll already have this information on your traced drawing.
To avoid confusion, you can use a very light pencil to write the letter “Y” on the yellow spots.
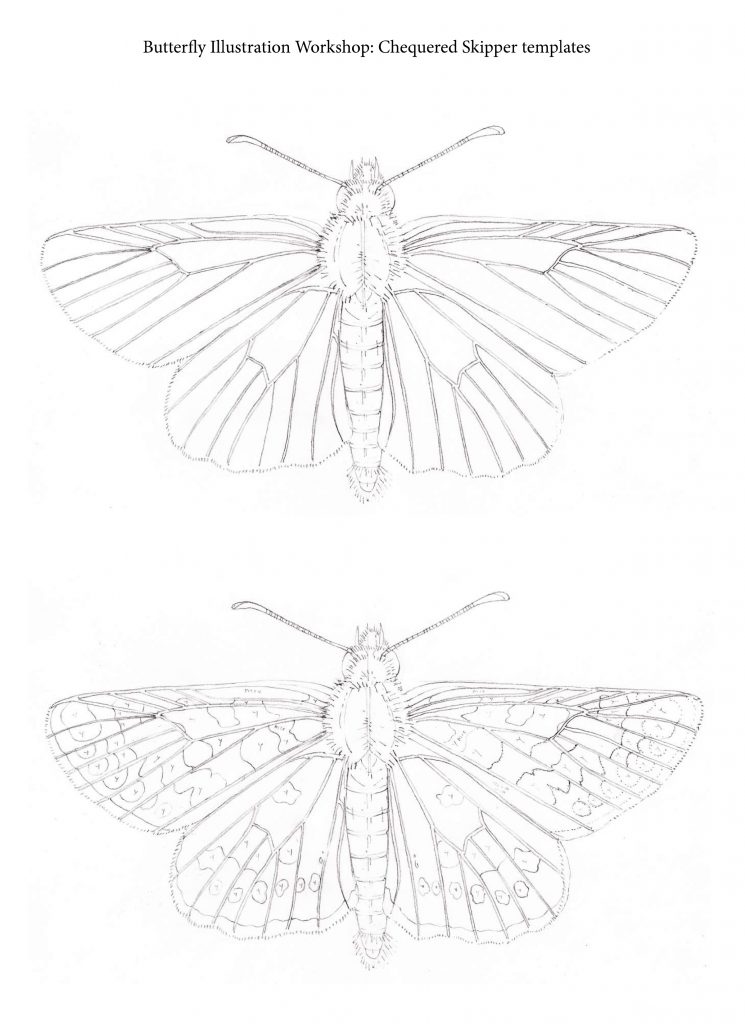
Pencil tracings of the Chequered skipper without markings (top) and with markings (bottom)
Transfer the drawing to Hotpress watercolour paper
Again, there are various ways of doing this. One is by using “tracedown” or “push-through paper” which has graphite on one side. Insert this under your tracing and the watercolour paper, then redraw your tracing.
A second way is to draw over the back of your tracing with soft graphite, then re-draw the tracing.
The third and easiest is to make sure your drawn lines are on the side of the sheet touching the watercolour paper (you’ll need to redraw your tracing on the other side of the sheet to achieve this). Then find a hard, blunt object, stick your tracing down with masking tape, and rub (not too hard). The graphite will transfer onto the watercolour paper.
Check your drawing with the reference
Does it look symmetrical? Are the wings lined up correctly? Is the body the right width? Fix errors now, you won’t be able to make changes once you begin painting.
Mix up your colours for a colour map / first layer of colour: Browns
The brown of the Chequered skipper is a warm, purplish colour. Mix Vandyke brown, Cobalt blue, and purple (or similar colours) to achieve this. Add clean water to make the colour more dilute.
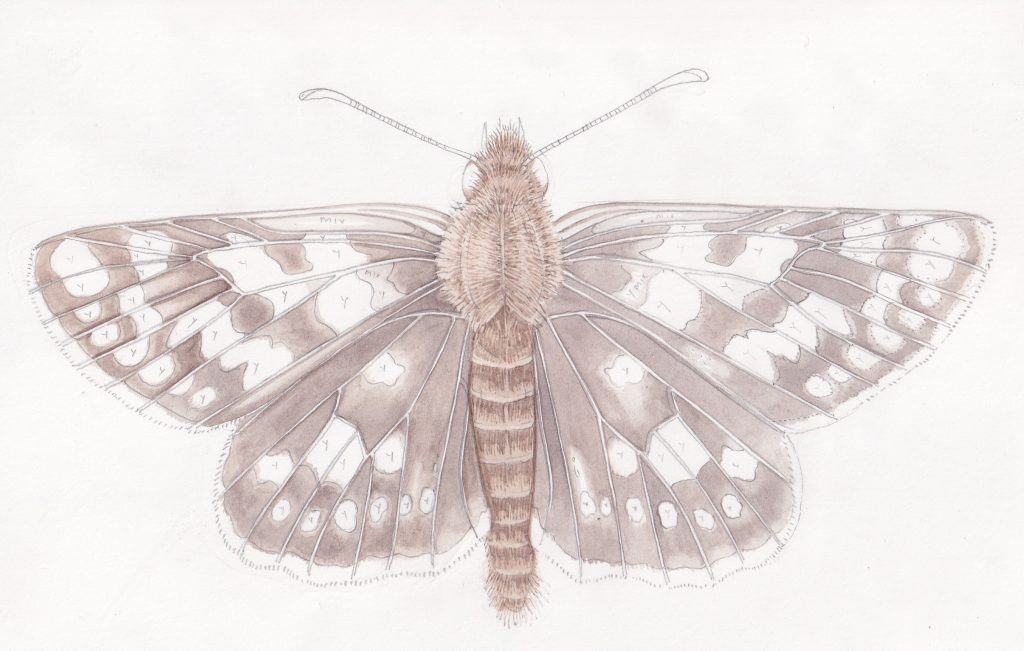
First layer of colours: Browns
I use Winsor and Newton watercolours, a series 7 sable brush (size 1), and paint onto Fluid 100 Hotpress paper (unstretched).
When you’re painting, always try to follow the direction of growth – in this case, echo the direction of wing veins, and growth of the fur on the body. The harder you press the thicker the line. Make sure you allow the tip of the brush to follow the brush stroke; don’t push in the opposite direction to the bristles unless you want a thick and uncontrolled line.
Consistency of paint is important. For paler colours (made pale by diluting with water, not by adding chalky white watercolour paint) it’ll be quite watery. For darker colours you’re looking for a mix with a consistency a little like single cream, or blood.
Plot in the areas of brown, making the colour more diluted (and thus paler) towards the edges of the wing, and darker (less dilute) at the edges of the veins. Keep highlights and veins as white paper. In watercolour, your white paper is your brightest area of colour, so don’t swallow it up.
Don’t forget to plot in the browns of the butterfly body too, adding texture by doing longer brush strokes to emulate the hairs.
Once bone dry, and being aware of the veins, you can now rub out pencil lines showing the markings before adding the yellow. Rubbing out over the brown paint will not lift the pigment but will remove the pencil.
Mix up your colours for a colour map/ first layer of colour: Yellows
The yellow is a mix of Naples yellow, Gamboge hue, and Cadmium orange. Any mix of Naples yellow plus a lemon-y yellow and a touch of orange should work fine.
Apply this semi-watery mix to the edges of the yellow spots, and the edges of the wing veins. With a lightly paler (more dilute) yellow, fill in most of the spots, only leaving white paper for highlights.
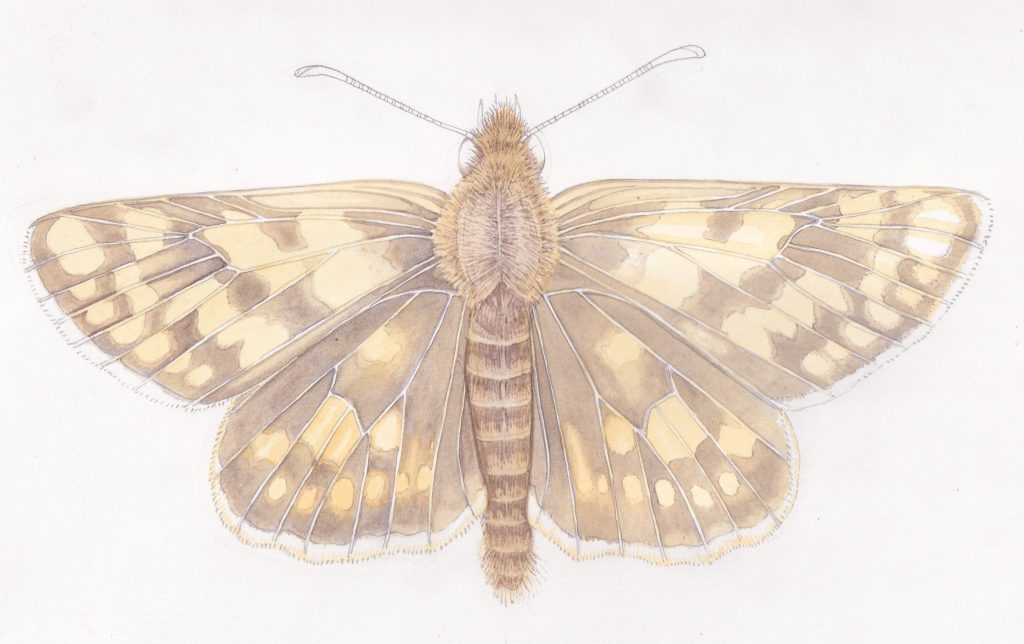
Yellows added
Add the yellows to the area of the body that need it; a horseshoe shape at the top of the thorax, the head, tail, and the clubs on the antennae.
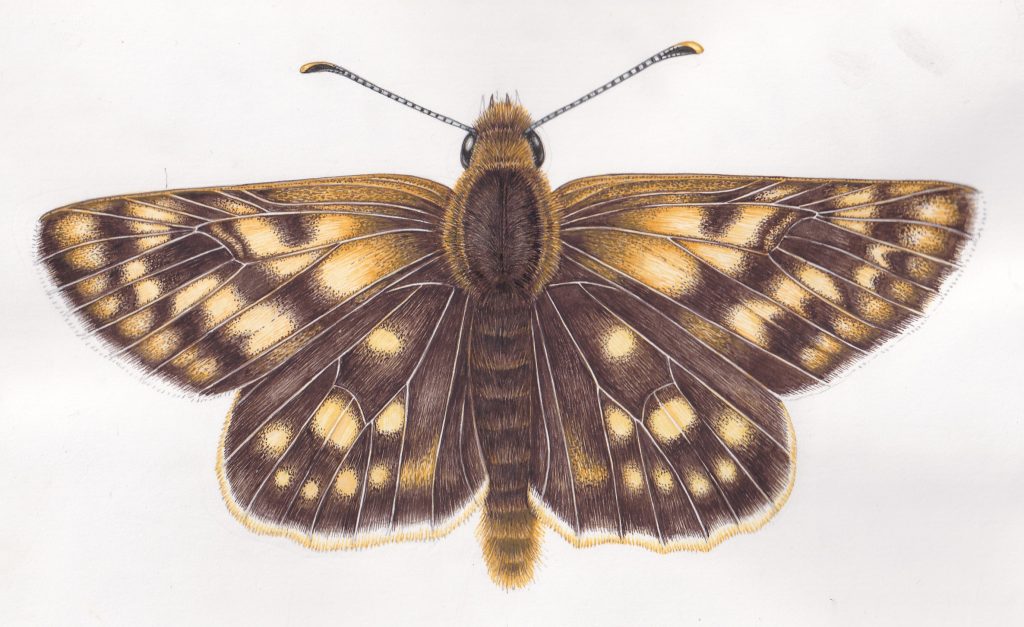
Add details and texture: Yellows
Starting with the yellow, add depth, colour, and detail to your illustration by building up lots of tiny brushstrokes.
Mix a slightly darker yellow than before – less dilute with a tiny bit more orange.
The more strokes you make, the darker and more saturated that area will be. For the yellows, focus on making these marks on the edges of the veins, and on the edges of the yellow spots.
Building depth of colour and texture into the yellows
Add details and texture: Browns
Mix a slightly darker brown by making a less dilute mix, and tweaking the ratio of the purple, brown and blues.
Using tiny strokes, lay down depth and colour, and build tonality and vibrance into your painting. Focus on the edges of the veins, the wide areas of solid brown, and where the wings attach to the body.
Working into the brown of the lower wings
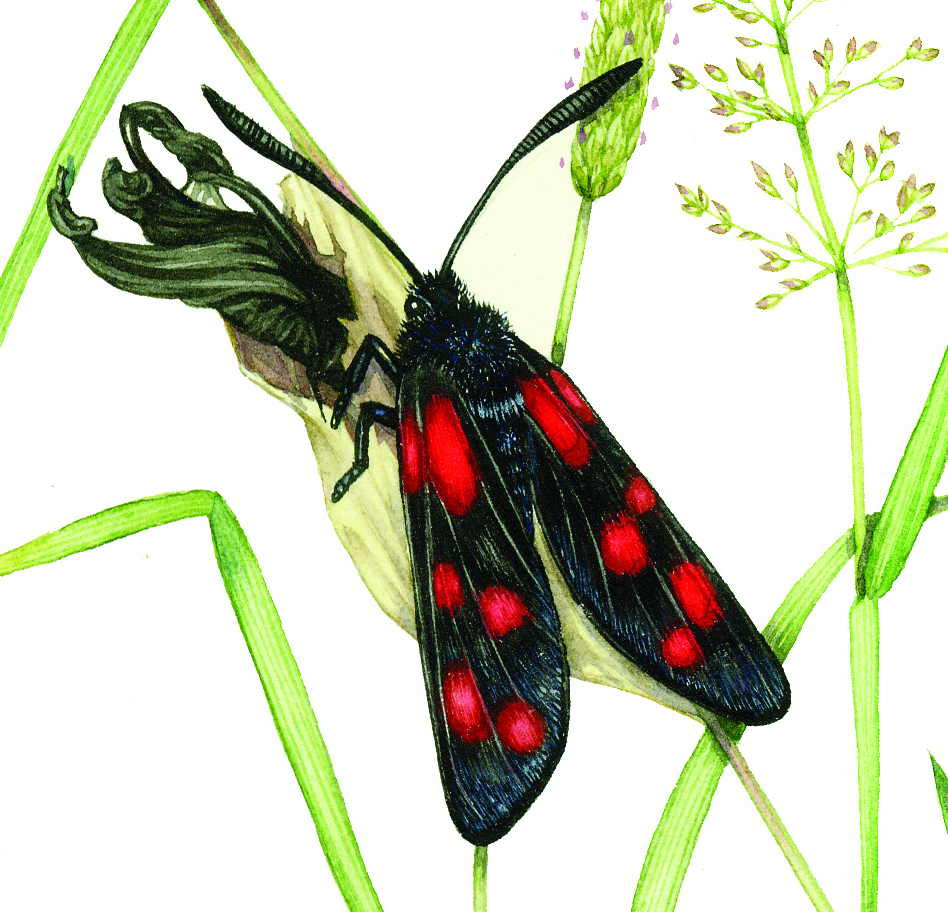
In the Chequered skipper, all the wing veins are dark brown, so outline these. Make the edges of them less stark by softening them with the occasional tiny brown spot along their length.
When you come to an area of yellow, use shorter choppy lines to transition between the colours. Lots of tiny dots will also help, and look a little like butterfly scales.
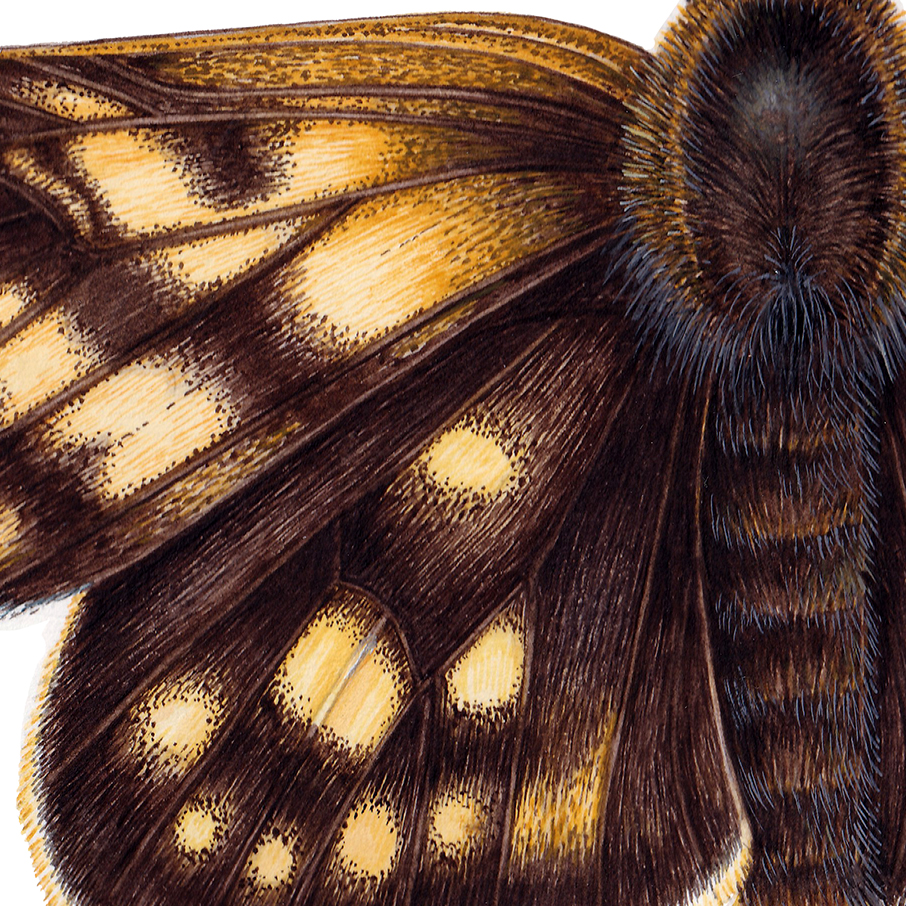
Close up showing how tiny dots resemble scales and help the eye “transition” between the brown and yellow areas
Don’t forget to work into the butterfly body. Look at your reference to try and understand the direction of growth of the hairs, and let this inform your brush strokes.
Adding detail: Antennae and eyes
For the antennae and eyes, you need a darker colour, closer to black. Mix some of your Brown with indigo (or a greenish dark blue) and a touch of purple. This makes a much prettier black than a pre-mixed colour.
With a steady hand and a light touch, outline the antennae. Then fill in the black stipes. Once completely dry, get a very dilute bit of Cobalt blue and carefully put a thin line of this on either side, on the antennae, to provide shadow.
For the eye, using the same mixed black, outline the edge of the eye. Paint around the highlight, where the light reflects from the compound eye. One dry, dilute your black to a very pale grey, and add a subtle concentric circle of this around the highlight of the eye. If you mess up, don’t worry. You can always pick out the white shine on the eye with a bit of permanent white gouache.
Tweak your Yellows
Towards the body, and on the outside edges of the Chequered skipper’s wings, the yellow is a bit more orange.
Mix up a slightly darker yellow (by adding more orange, or even a touch of your brown).
Working into the yellows
Using the same technique of tiny brush strokes, add this colour to the areas that need it, always referring to your reference. Don’t forget the butterfly body – there’s plenty of yellow in that horseshoe shape around the top of the thorax, on the head, and on the fluffy “tail” or base of the abdomen.
Tweak your Browns
Mix up a darker and bluer brown, by altering the ratio of the blue/ brown/ purple mix.
Using brush strokes to copy the fur, paint in lots of hairs that cover the butterfly body, always following the direction of growth. Top with a dilute and watery brown mix, and allow to dry.
Browns are dark, only needing a little more depth
Knock back the veins on the wings
Using a brown, simply paint over the wing veins (which up til now have remained white).
Pick out your darkest darks
Mix a nice dark brown/black with your brown, blue, indigo, and purple. Using the paint quite thick, and with the same tiny brush strokes, pick out your darkest areas. At the junction of body and wing, where the top wing slightly overlaps the lower wing, in the middle of the large areas of crown, on the body.
Add hairs to the thorax and abdomen
Mix some Permanent white gouache with your yellow and using very light strokes, add some hairs to the thorax edges.
Do the same, but with a little black in, to add texture to the abdomen. Don’t overdo it. Play around til it looks right.
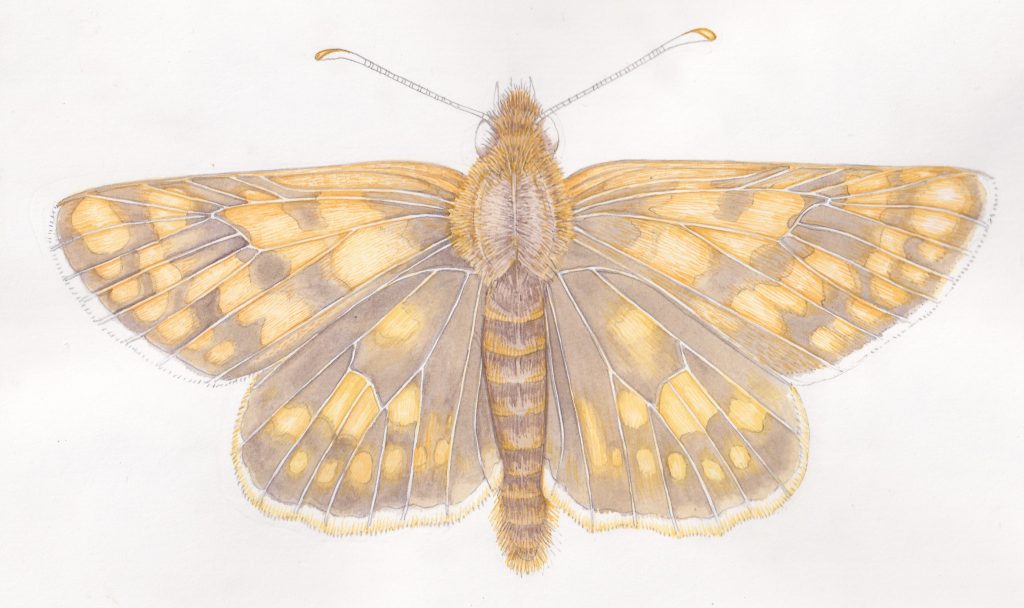
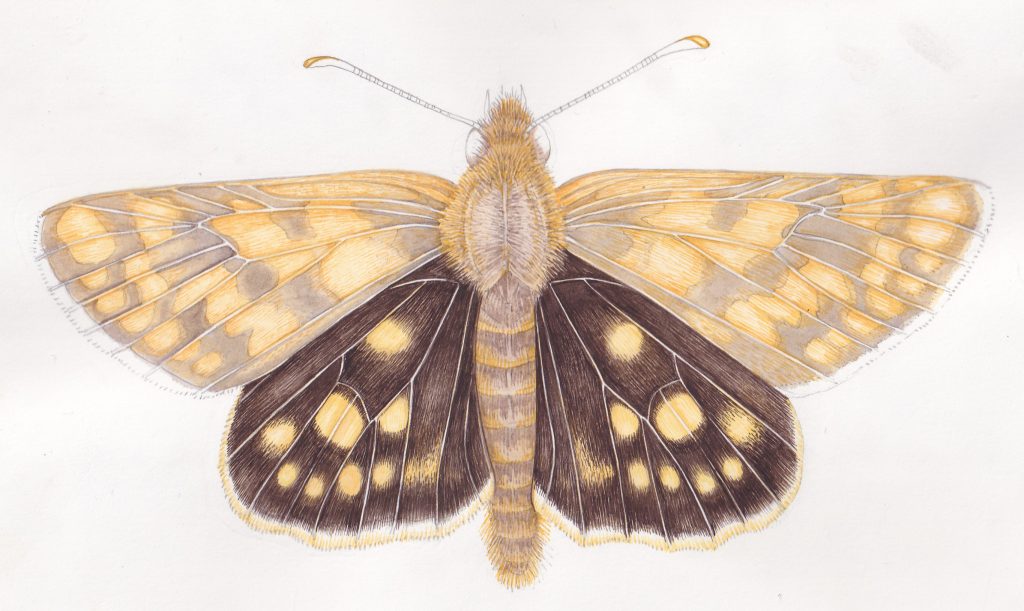
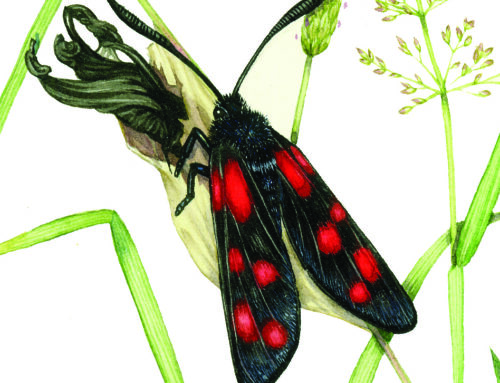
Completed butterfly
And here’s the whole process condensed onto one sheet:
Finished!
Well done! Go and make yourself a well-earned up of tea.
Never feel disappointed with a painting you’ve done. If it goes well, that’s lovely. It if doesn’t, have a think about what you can learn from it. Did you cover up all the whites of the page too fast? Did you overwork it? Do you need to practise to get your brush strokes finer?
Also, be aware, using this approach takes a long time. It took me a good 10 hours to paint this Chequered skipper, and I’ve been doing it for years. The more you paint, the more confident you’ll become, and the better you’ll get.
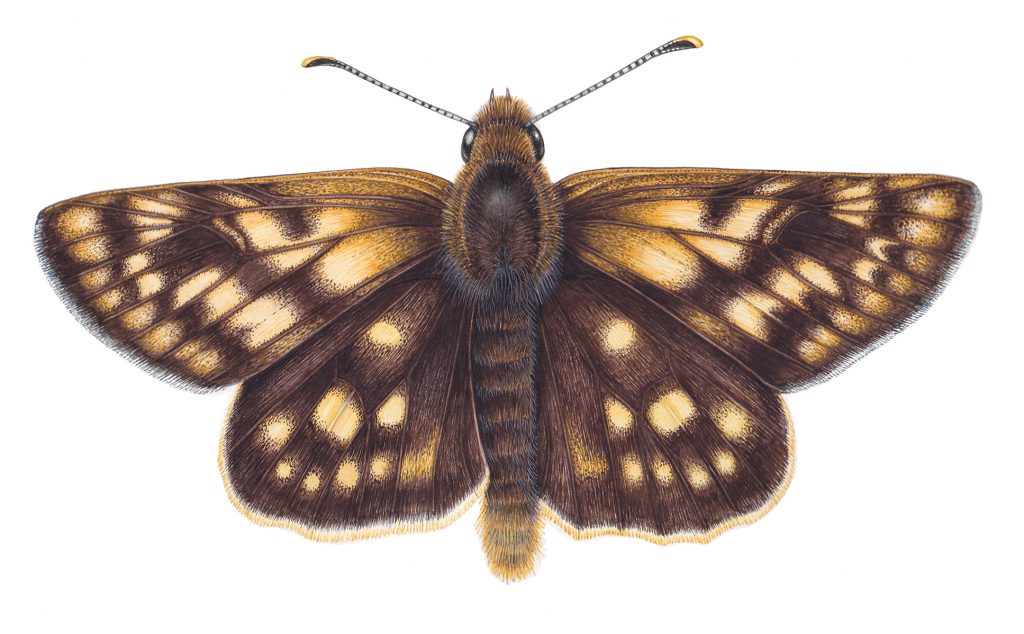
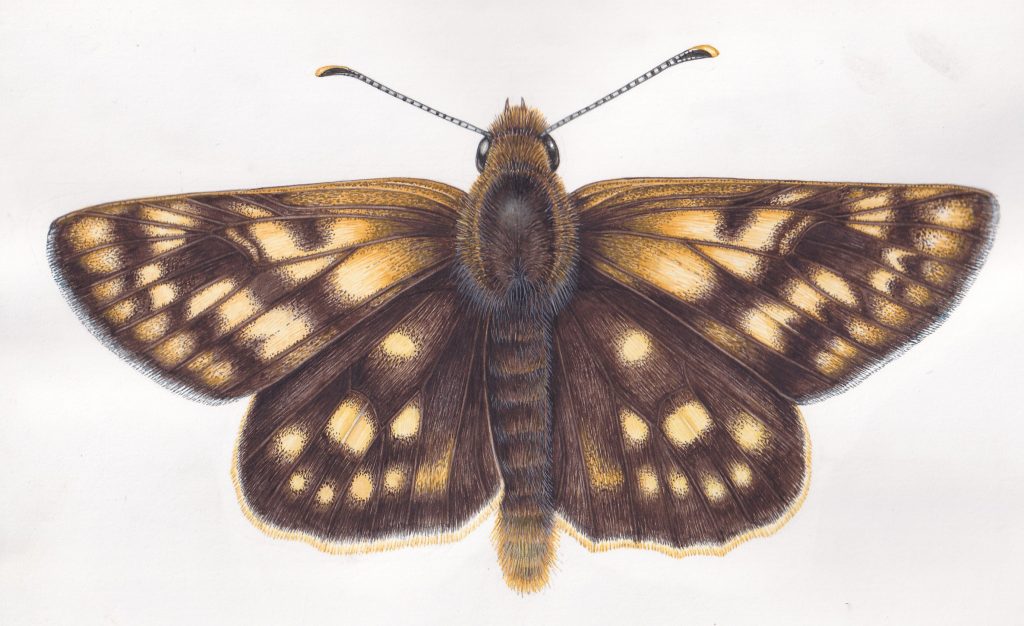
Final illustration – computer scan
Conclusion
I hope this blog has proved useful. It goes without saying that this approach will work for every butterfly or moth you choose to illustrate.
Thanks for sticking with it. It’s a long process, and anyone who claims painting is relaxing hasn’t been doing this sort of illustration! But the end product can be something to treasure, and a good reminder of the wonderful conservation story of the Chequered skipper. For more on the conservation project, please check out the post from Back from the Brink
Later in the year I plan to share the video that accompanies the online workshop on illustrating this butterfly which will be going out on May 8th 2021 (fully booked) so keep an eye out for it on my Youtube channel.
Limited edition giclee A4 format size prints of the butterfly are available for sale at £60 each (including postage & packaging to UK – add an extra £10 to cover p&p for international addresses). Butterfly Conservation will receive £10 per sale to help them fund future exciting conservation projects. Please email me on: info@lizzieharper.co.uk if you’re interested.
The post Chequered Skipper Butterfly Illustration appeared first on Lizzie Harper.
